8.5x11 / A4 Shopify Packing Slip Code Template Instructions - Design D
This guide will provide you with all the steps required to add your new Shopify Packing Slip template to your Shopify site. If you haven't purchased the template yet, you can find it by clicking here.
To complete this set up process you will need to have an image for your business logo and have downloaded the template code, which will have been emailed to you following your purchase (shopify_packing_slip_design_d.txt).
Step 1 - Log into Shopify
Step 2 - Upload your business logo and social icons to Shopify
- Within the Shopify Admin area, click on Settings in the bottom left-hand corner of the screen
- Select Files from the left-hand menu
- If you do not already have logo or social icon images uploaded, click Upload Files and upload your business logo and up to three social icon images (for best results, ensure the images are cropped so whitespace around the image is removed) - Social icons will be displayed at 30 x 30px
- Within the file table, click the link icon to the right of each image and copy the image URLs

- Paste the links copied in part 4 somewhere that can be easily accessed later on in the process
Examples of where you could paste the links are Notepad or Word applications. It does not matter which you choose, as the links only need to be held temporarily whilst you set up this template.
Step 3 - Add the new template code
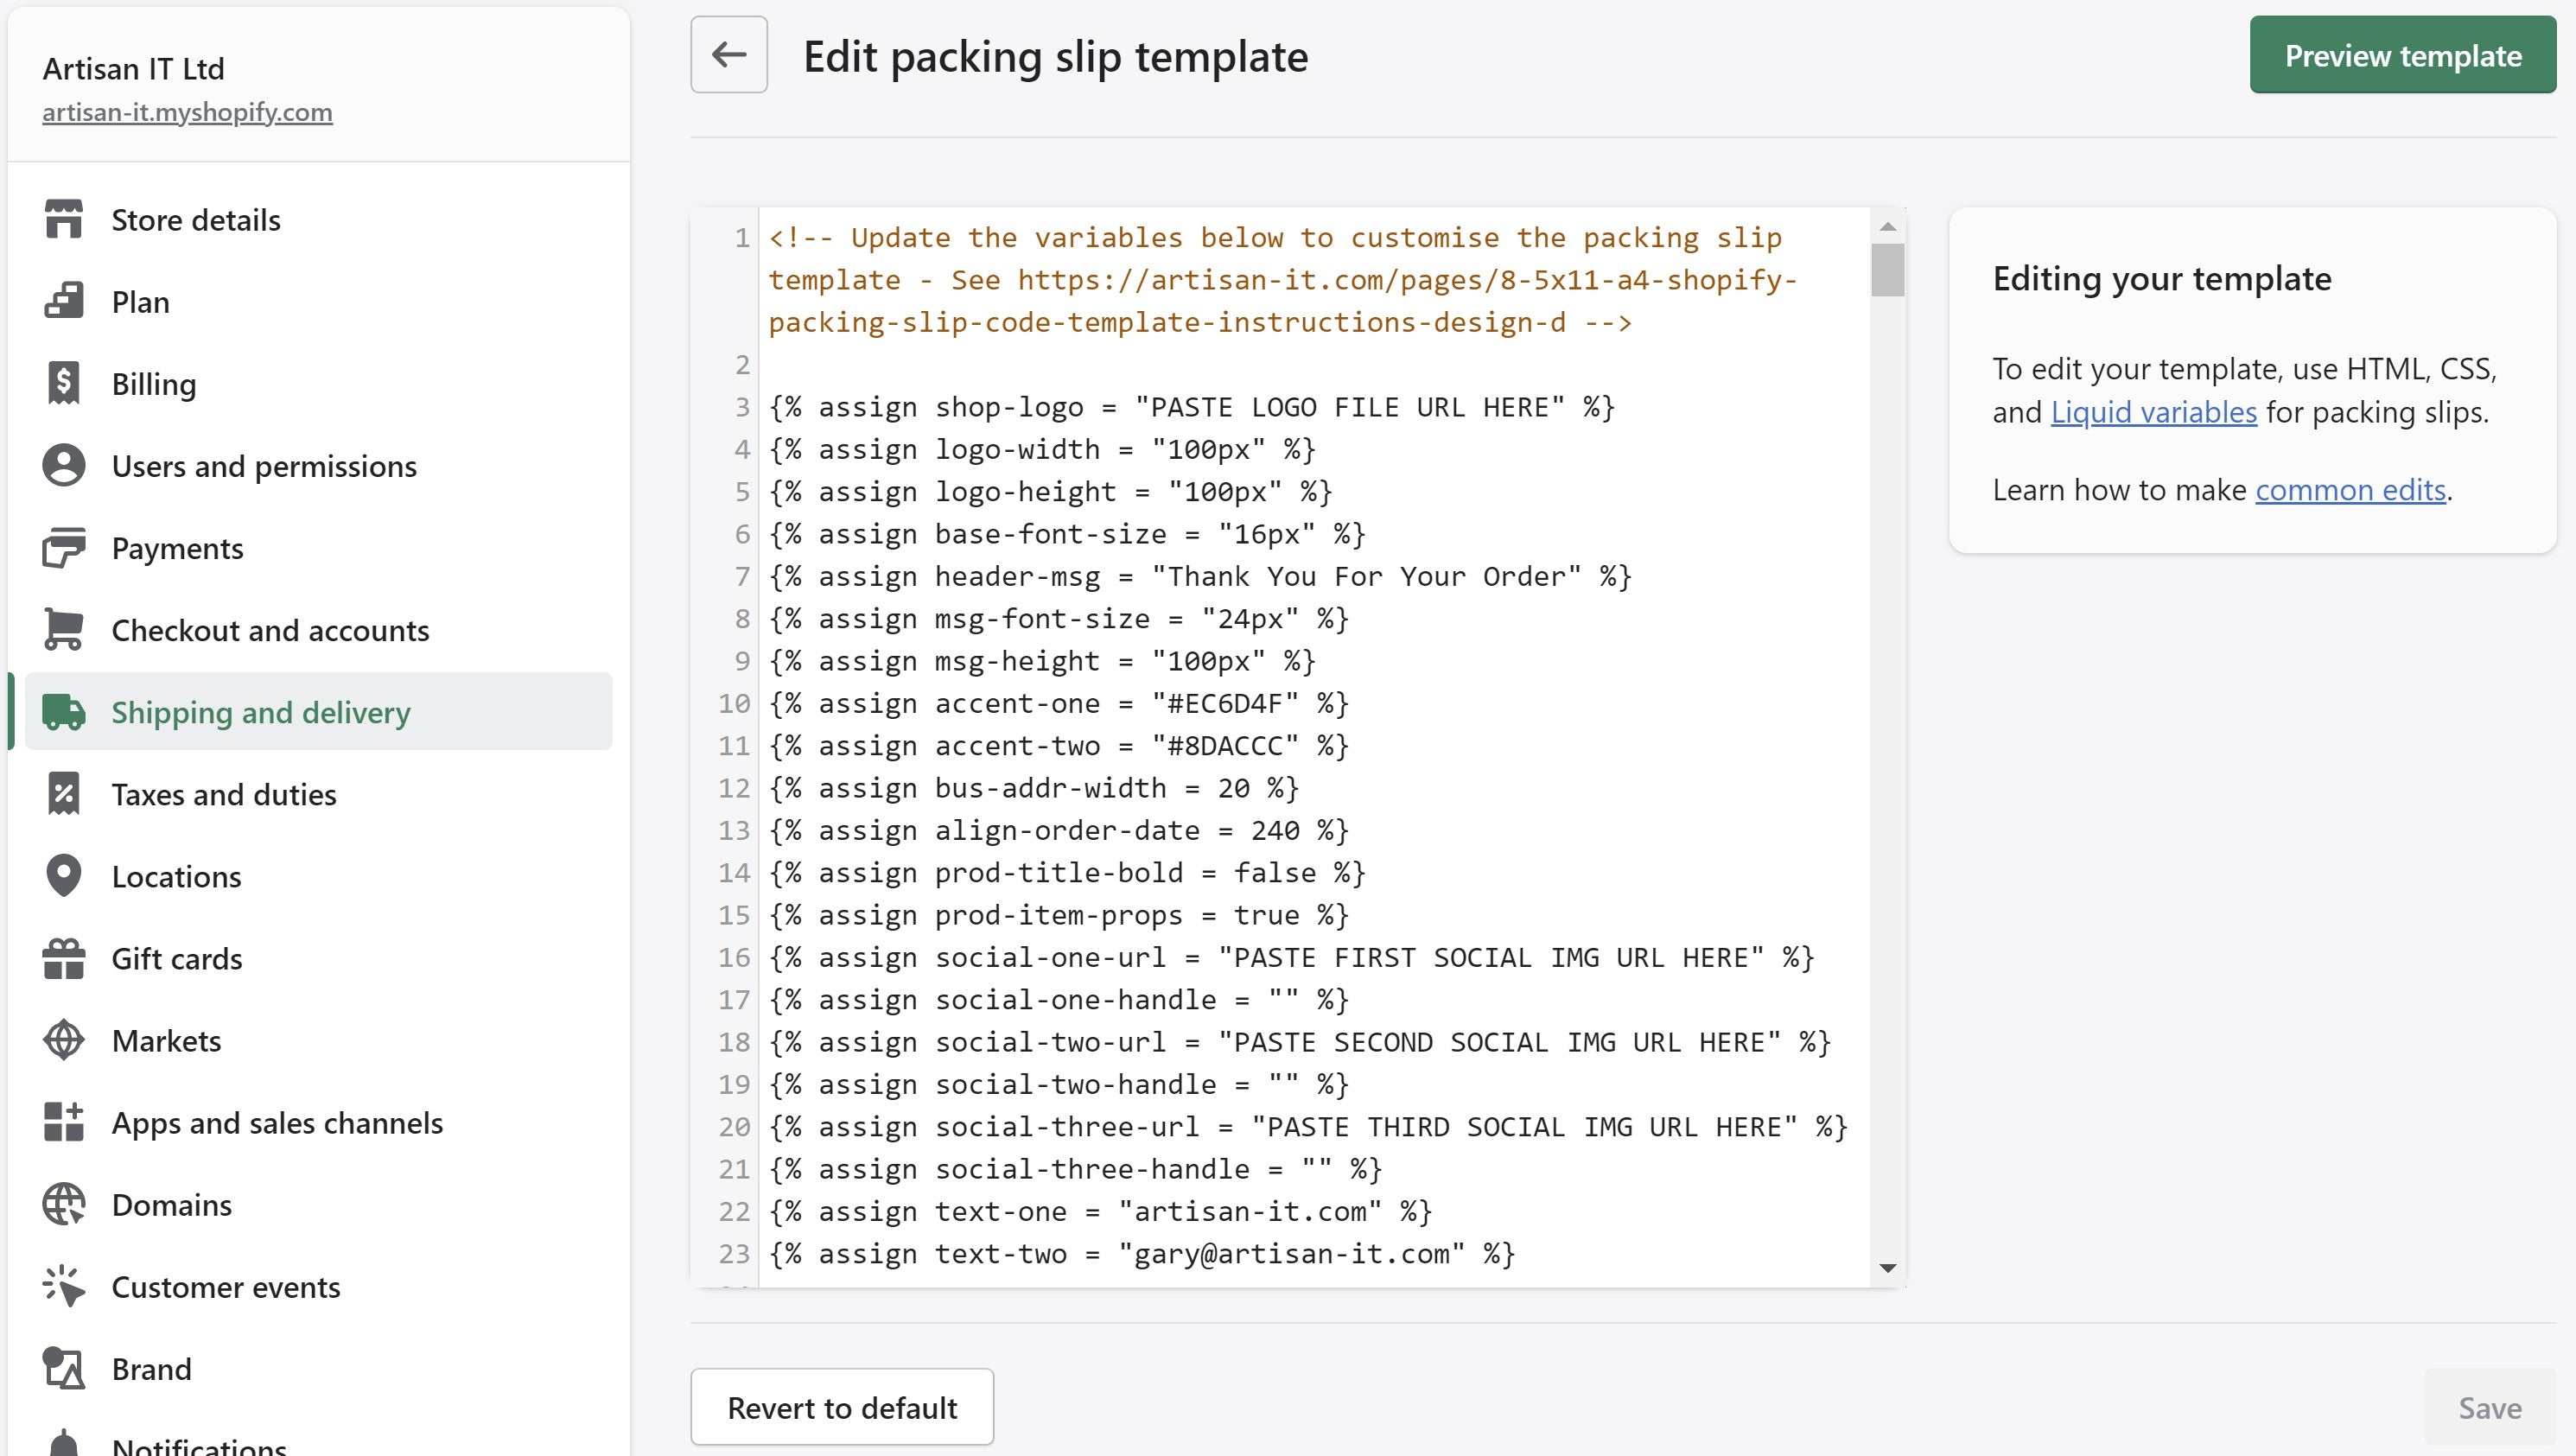
- Select Settings (bottom-left menu within the Shopify admin area)
- Select Shipping and Delivery
- Scroll down the page and within Packing Slips click Edit
- If you have previously customised the packing slip template, you may wish to copy the code and save in a file for future use (the default Shopify packing slip does not need copying, as you can always revert back to the default if you wish)
- Highlight all of the code in the Packing Slip Template and press Delete
- Highlight and copy all of the code beneath the dashed line for your new packing slip in the downloaded file shopify_packing_slip_design_d.txt
- Paste the copied code into the Packing Slip Template in Shopify on line 1
Step 4 - Add your business logo to the new template
- On line 3 {% assign shop-logo = "PASTE LOGO FILE URL HERE" %}, replace PASTE LOGO FILE URL HERE with the logo image URL that was copied in Step 2, Part 4 (do not delete the speech marks)
- Adjust the logo width and height values on lines 4 and 5
Step 5 - Adjust the base font size (if applicable)
The default font size used for the template is 16 pixels. If you wish to adjust this font size, on line 6 change the px value within the speech marks.
Step 6 - Set the message displayed in the header of the document
- If you wish to change the message displayed. On line 7 replace Thank you For Your Order with your required message (ensure the message is entered within the " " marks). If you do not want to display a message, make sure line 7 looks like this {% assign header-msg = "" %}
- To change the message font size, adjust the value between the speech marks on line 8 (the default value is 24px)
- To adjust the vertical alignment of the header message, adjust the value on line 9 (the default value is 100px). To move the header down the page, increase the pixel value
Step 7 - Set the primary accent colour for text headers
Step 8 - Set the accent colour used for horizontal lines
Step 9 - Set your business address width
To ensure the maximum space is made available for the customer billing and delivery address, it is important to minimise the space allocated to your business address.
On line 12 enter a percentage value (only a number is required - no speech marks or a % sign) to allocate that width to your business address.
To allocate 20% of the address section to your business address line 12 would look like this {% assign bus-addr-width = 20 %}
The template code has been written to divide the remaining area between the billing and shipping addresses equally.
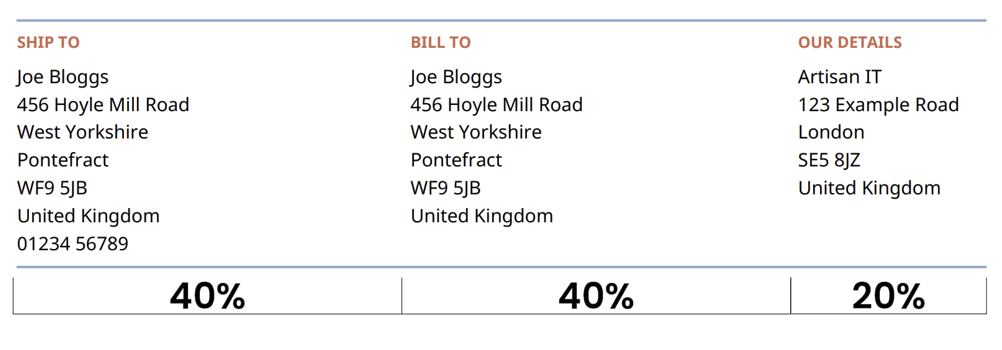
Step 10 - Align the order date with your business address (optional)
If you have altered the business address width in the previous step, you may want to re-align the order date heading.
To move the Order date to the right, on line 13 increase the value and likewise to move the order date to the left decrease the value (default value is 240).
Note - When reducing the amount of space given to the order date, take into account the date September 30, 2023 as this date contains the largest number of characters and requires the most amount of space.
Step 11 - Enable/disable bold product titles
- If you would like to make product titles bold, on line 14 set the following {% assign prod-title-bold = true %}
- To disable bold product titles, on line 14 set the following {% assign prod-title-bold = false %}
Step 12 - Display/hide additional item properties
- To display additional item properties, on line 15 set the following {% assign prod-item-props = true %}
- If you do not wish to display additional item properties, set the following on line 15 {% assign prod-item-props = false %}
If you are not capturing any additional item properties within your product listing and would like to add product page template features to do so, be sure to check out our Shopify product page features.
Step 13 - Add social icons to the new template
For this part use the social icon image URLs that were copied in Step 2, Part 4
- On line 16 {% assign social-one-url = "PASTE FIRST SOCIAL IMG URL HERE" %} replace PASTE FIRST SOCIAL IMG URL HERE with your first social icon image URL
- Add text or a social handle relating to the icon used in part 1 on line 17
- On line 18 {% assign social-one-url = "PASTE SECOND SOCIAL IMG URL HERE" %} replace PASTE SECOND SOCIAL IMG URL HERE with your second social icon image URL
- Add text or a social handle relating to the icon used in part 3 on line 19
- On line 20 {% assign social-one-url = "PASTE THIRD SOCIAL IMG URL HERE" %} replace PASTE THIRD SOCIAL IMG URL HERE with your third social icon image URL
- Add text or a social handle relating to the icon used in part 5 on line 21
- {% assign social-three-url = "PASTE THIRD SOCIAL IMG URL HERE" %}
- {% assign social-three-handle = "" %}
Step 14 - Customise the text beneath the social icons
- To adjust the text on the left, on line 22 replace artisan -it.com with your chosen text (do not delete the enclosing " " marks)
- To adjust the text on the right, on line 23 replace gary@artisan-it.com with your chosen text (do not delete the enclosing " " marks)
Step 15 - Save and preview the template
- Click Save
- Click Preview Template
Printing the documents
- Click Orders within the left hand menu of Shopify Admin
- Select all of the orders that you would like to print packing slips for
- Click the ... ellipses button
- Click Print packing slips
- Click Print
- To save the documents as a PDF, change the print destination to the relevant PDF setting
- If the colours are not correct on the printout, on Google Chrome, click More Settings and within Options ensure Background graphics is checked
- If you wish to remove the webpage header and footer generated by the browser, within Options uncheck Headers and footers